
How to Edit Expired Slide Film: A Technical Guide to Rescuing E-6 (Ektachrome 64T)
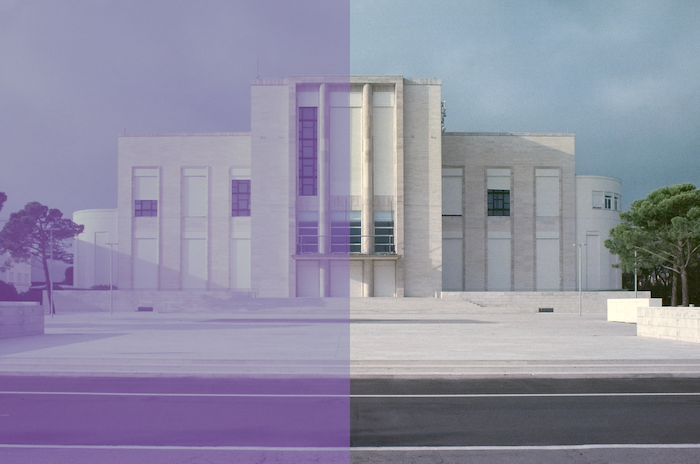
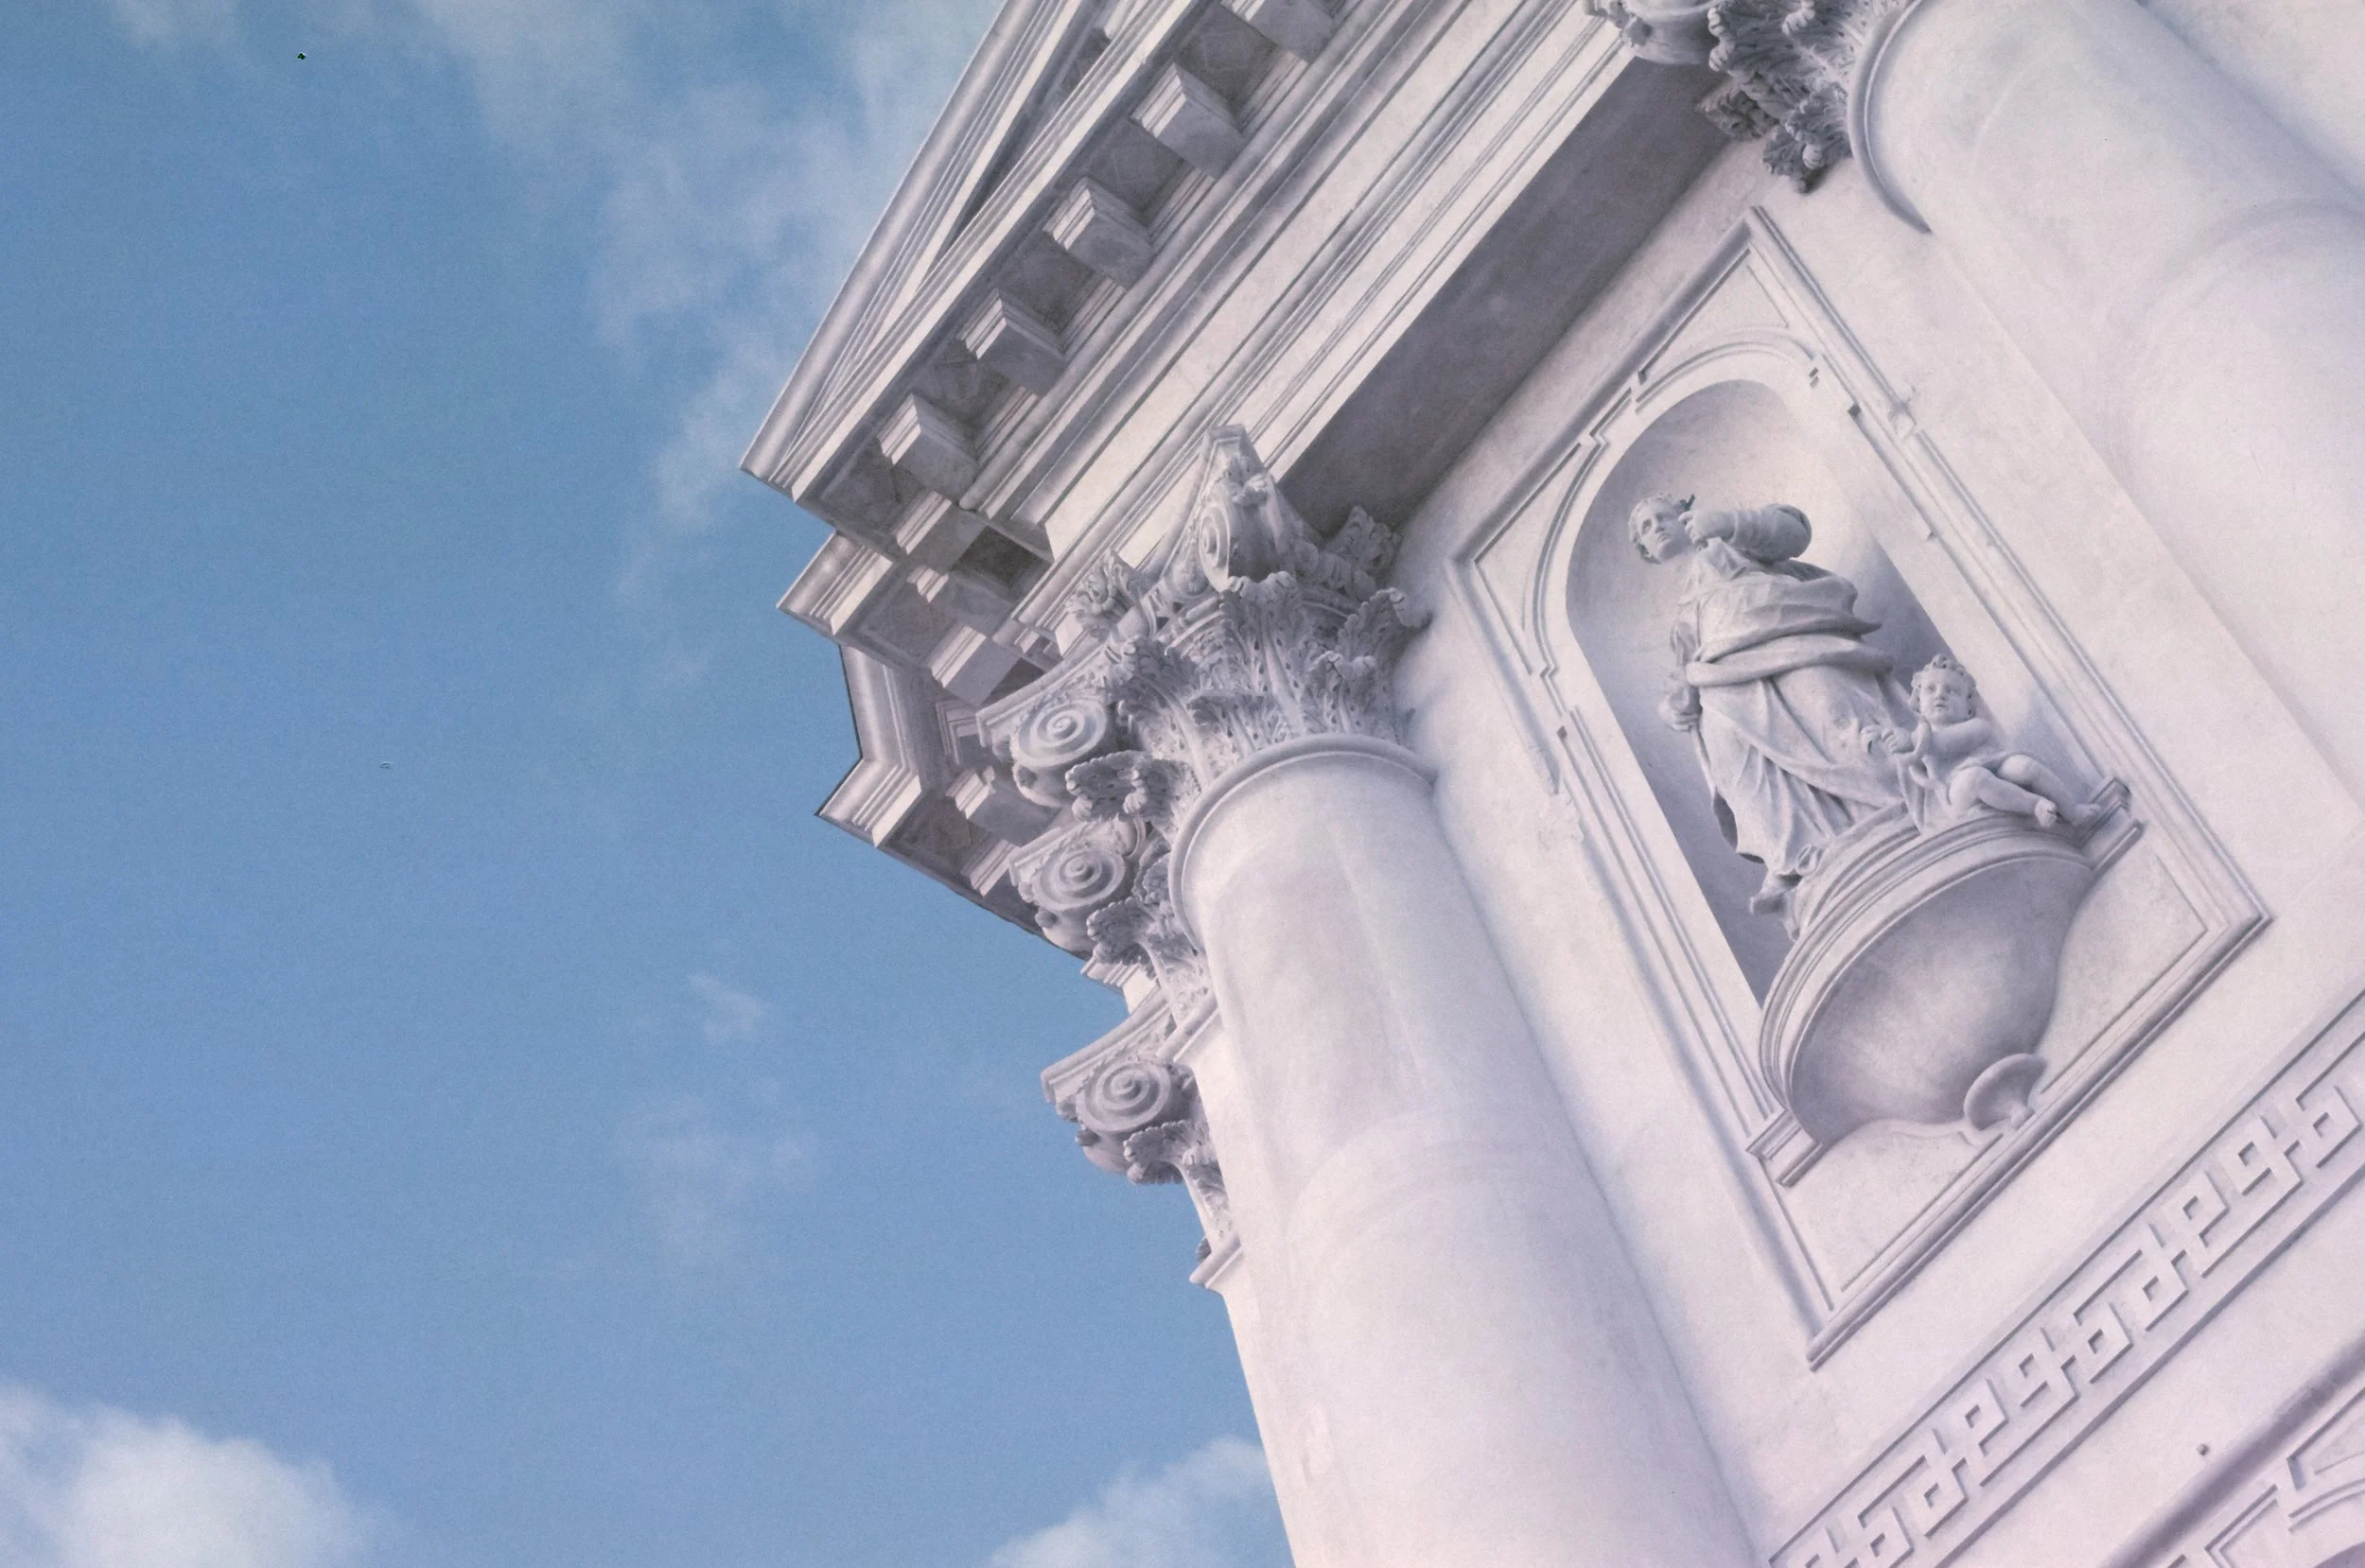
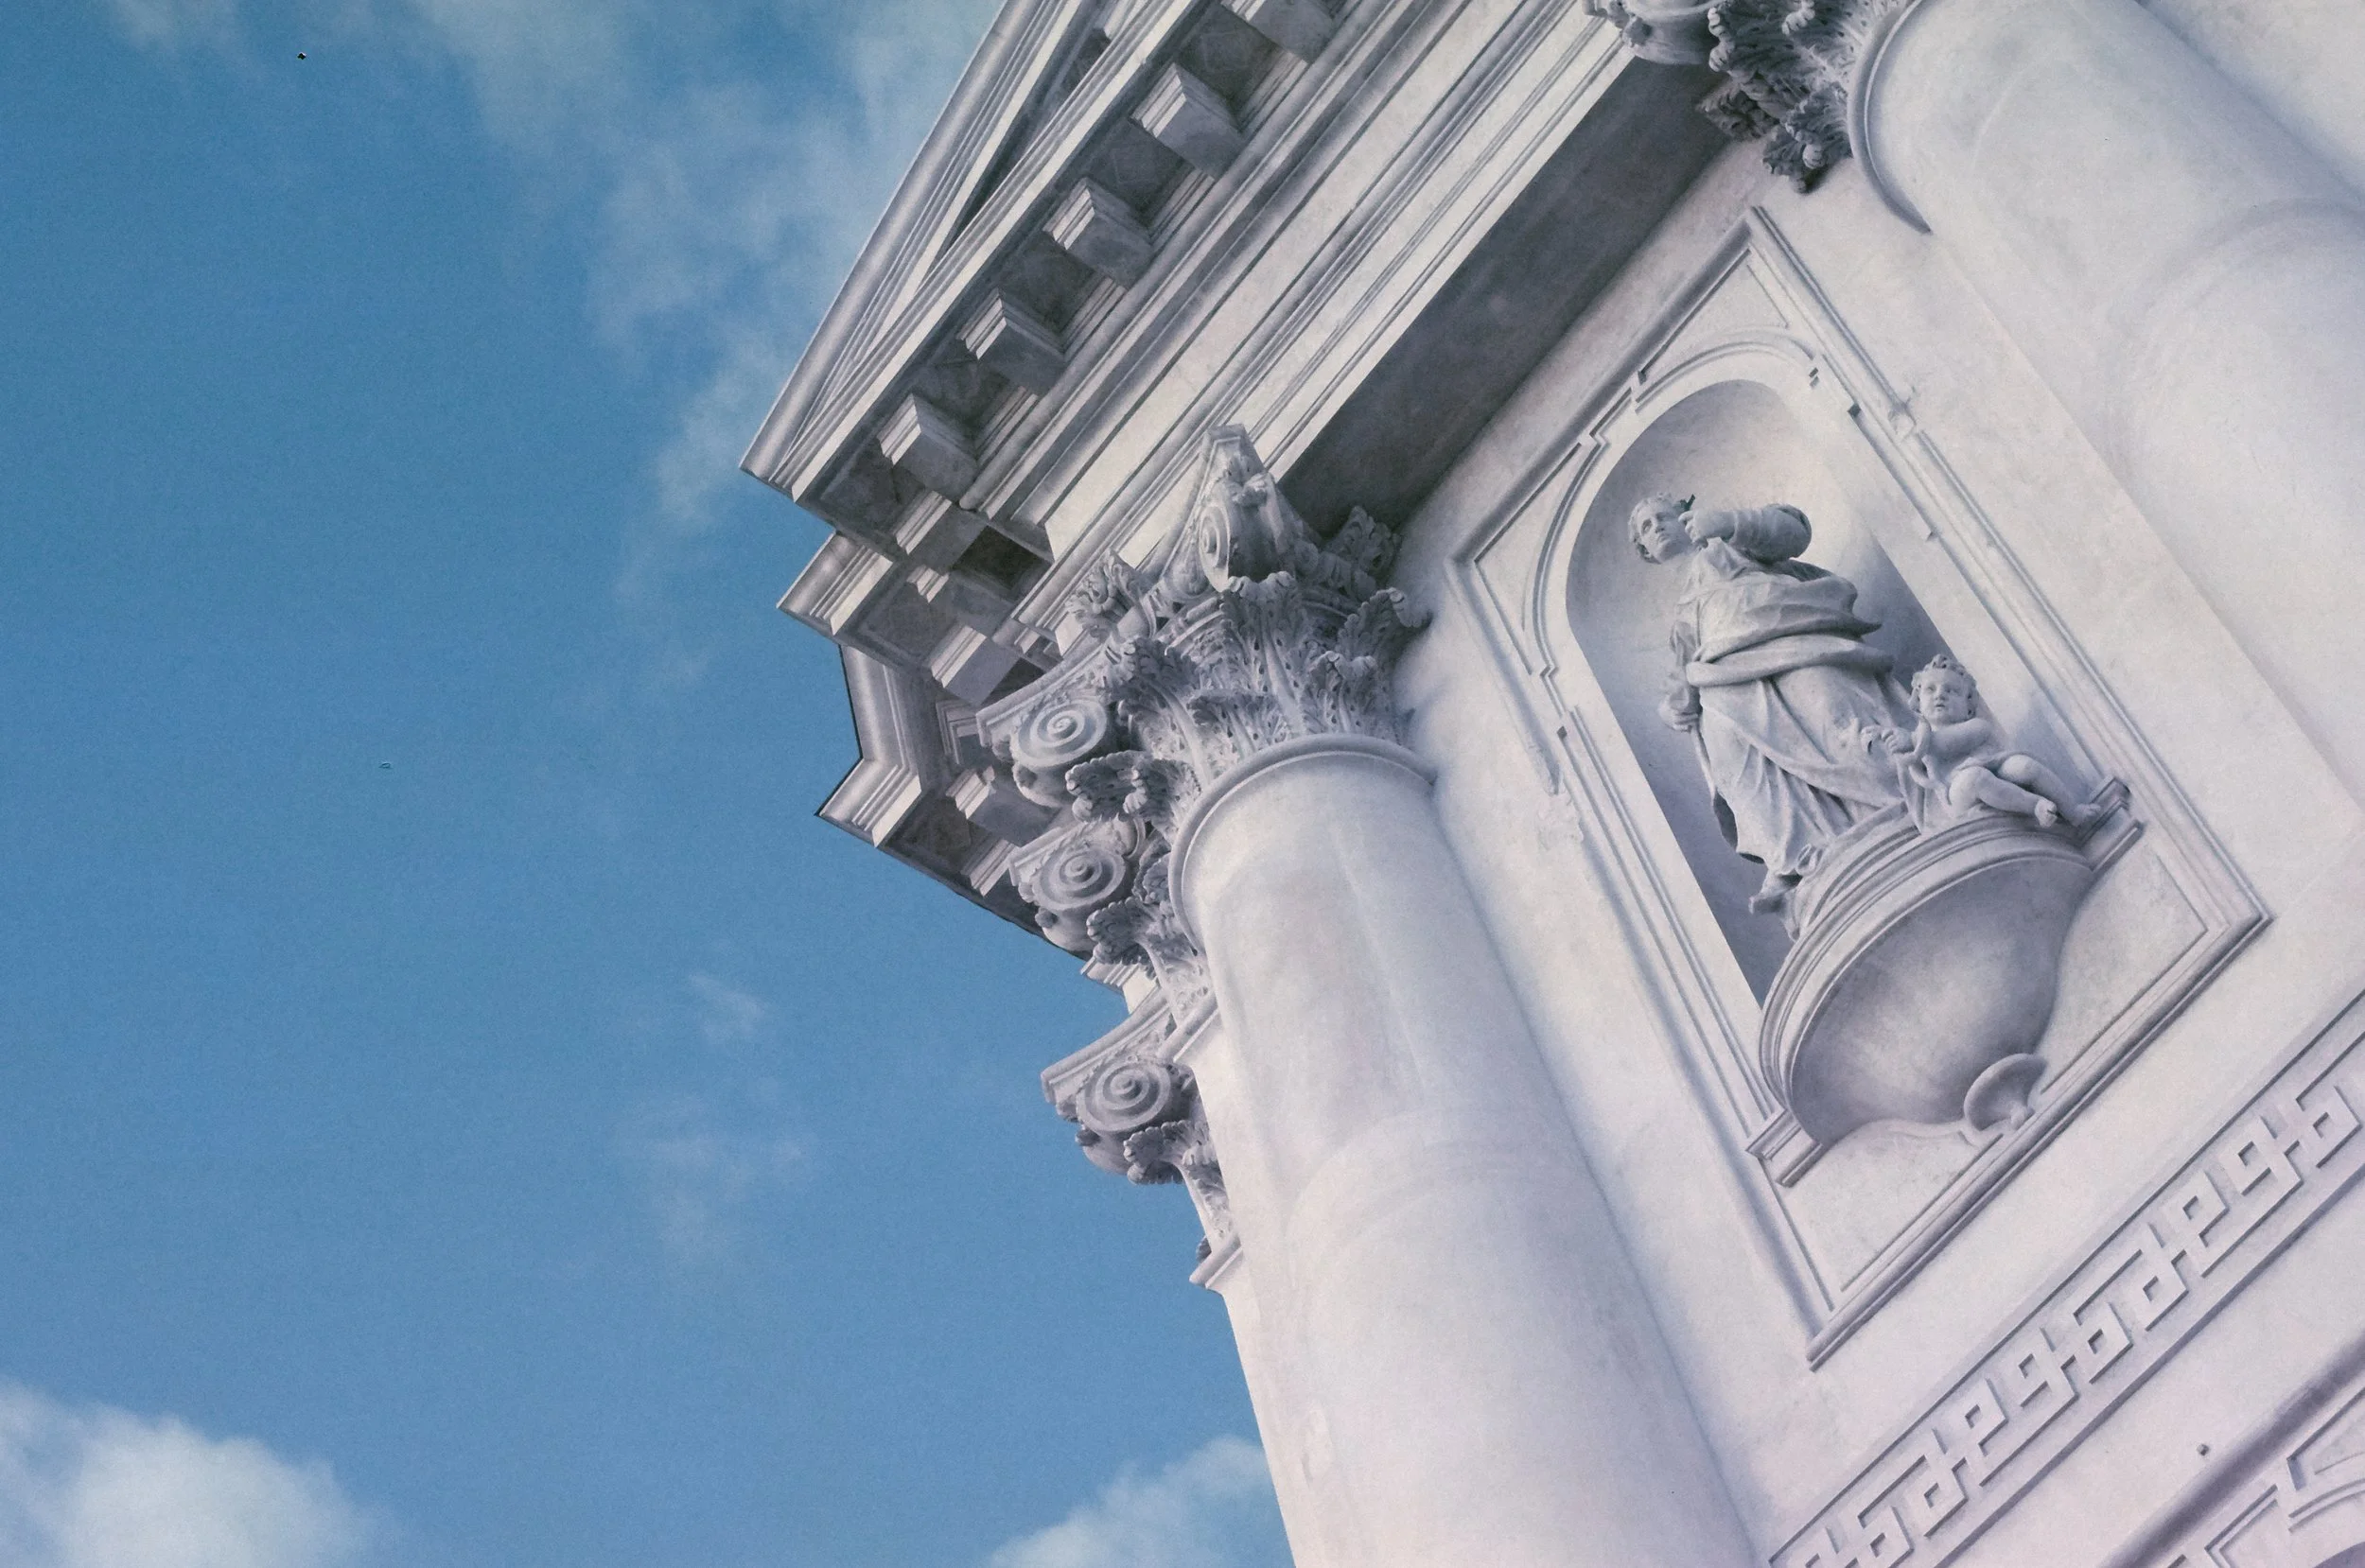
Kodak’s Ektachrome 64 - Raw scan (left) - corrected (right)
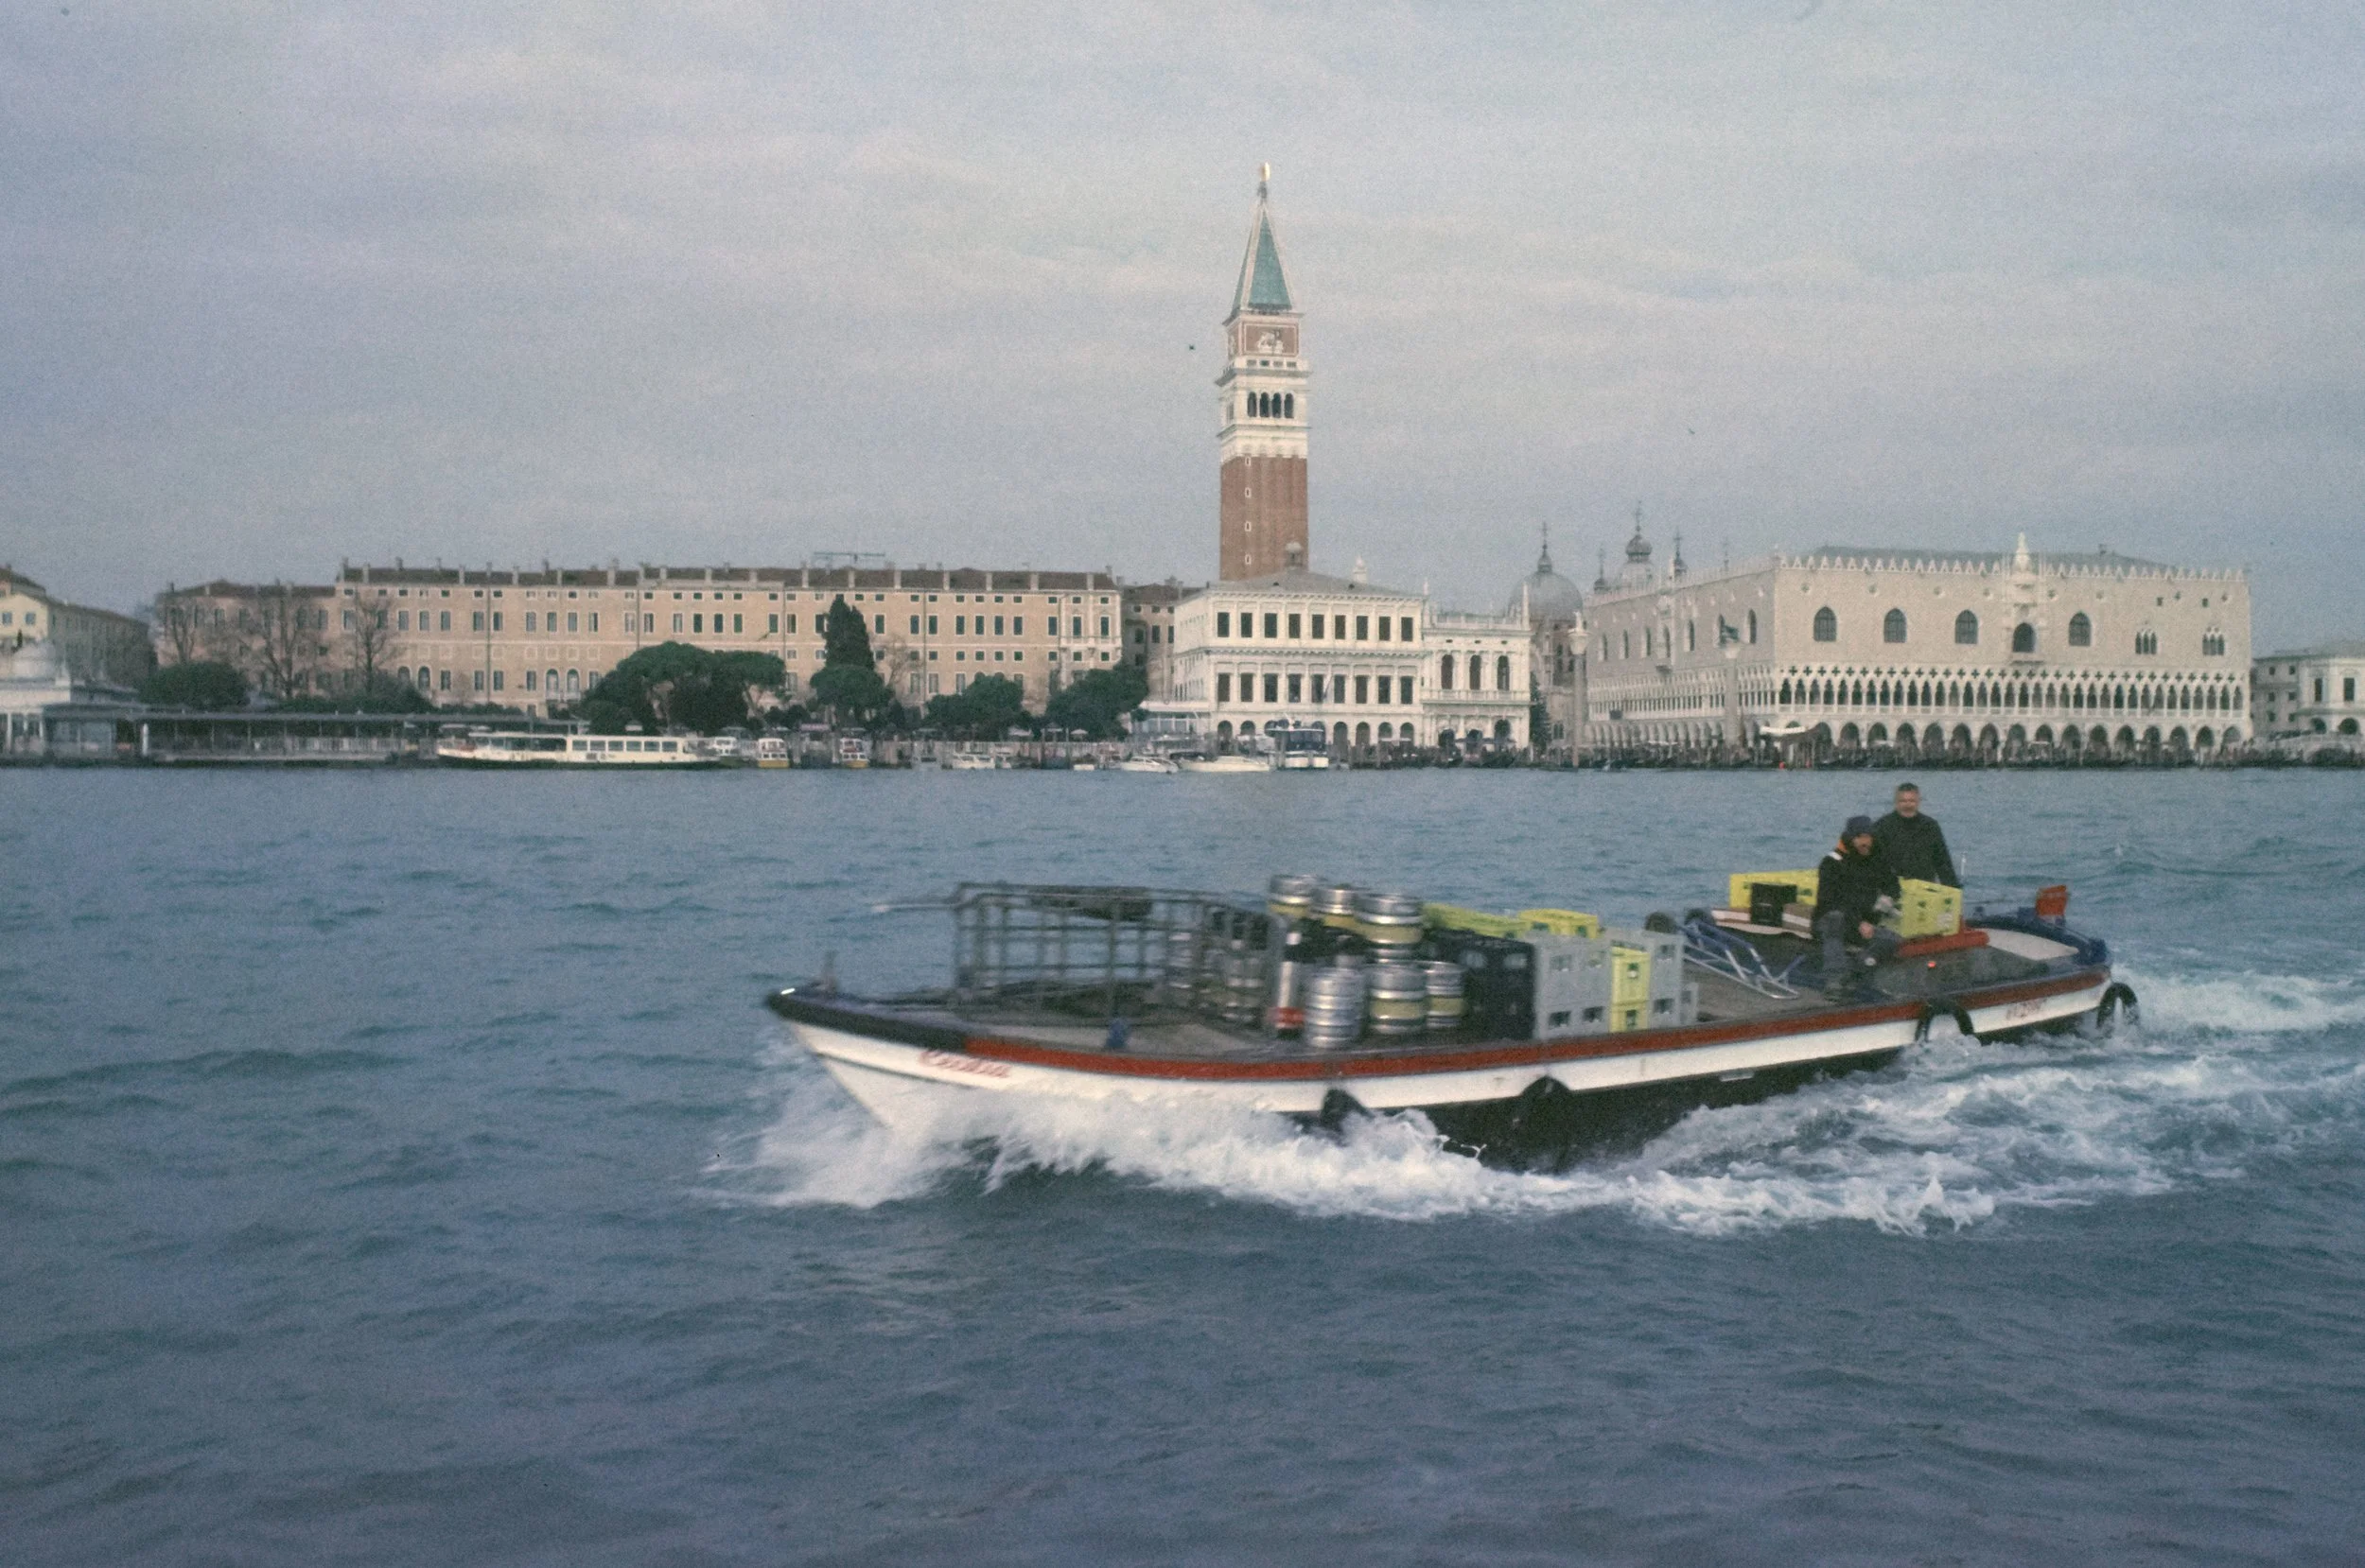
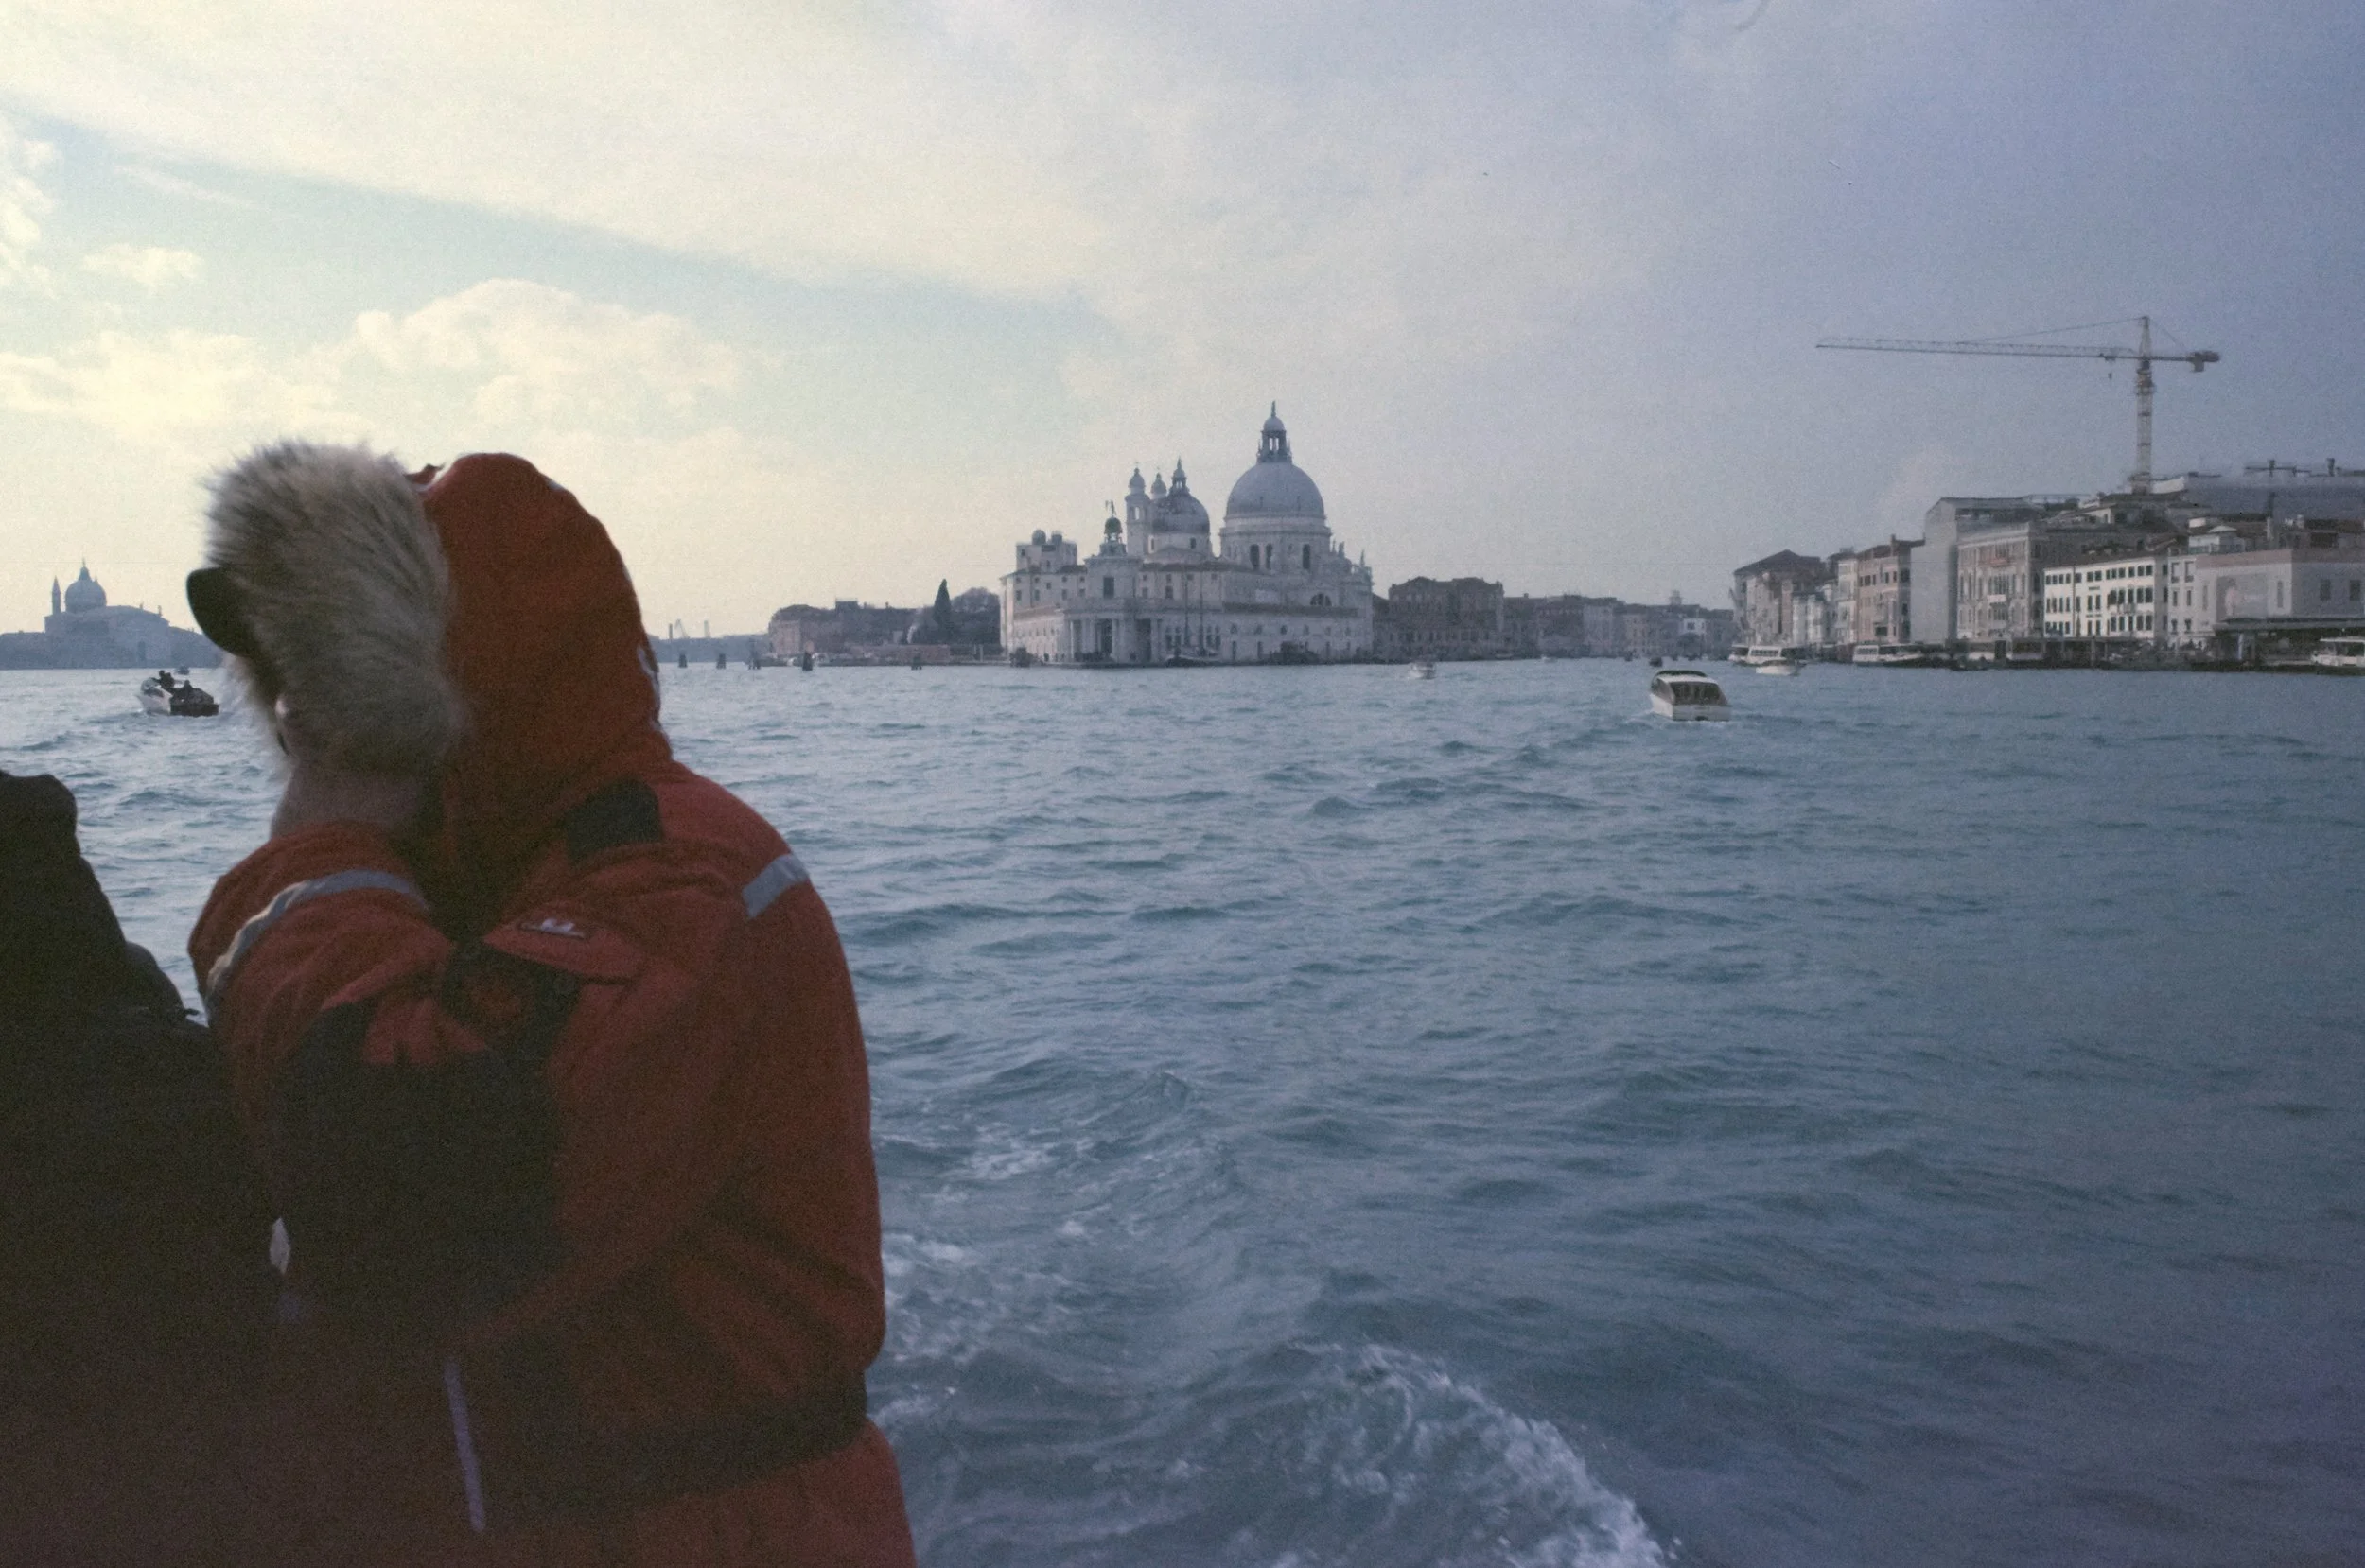
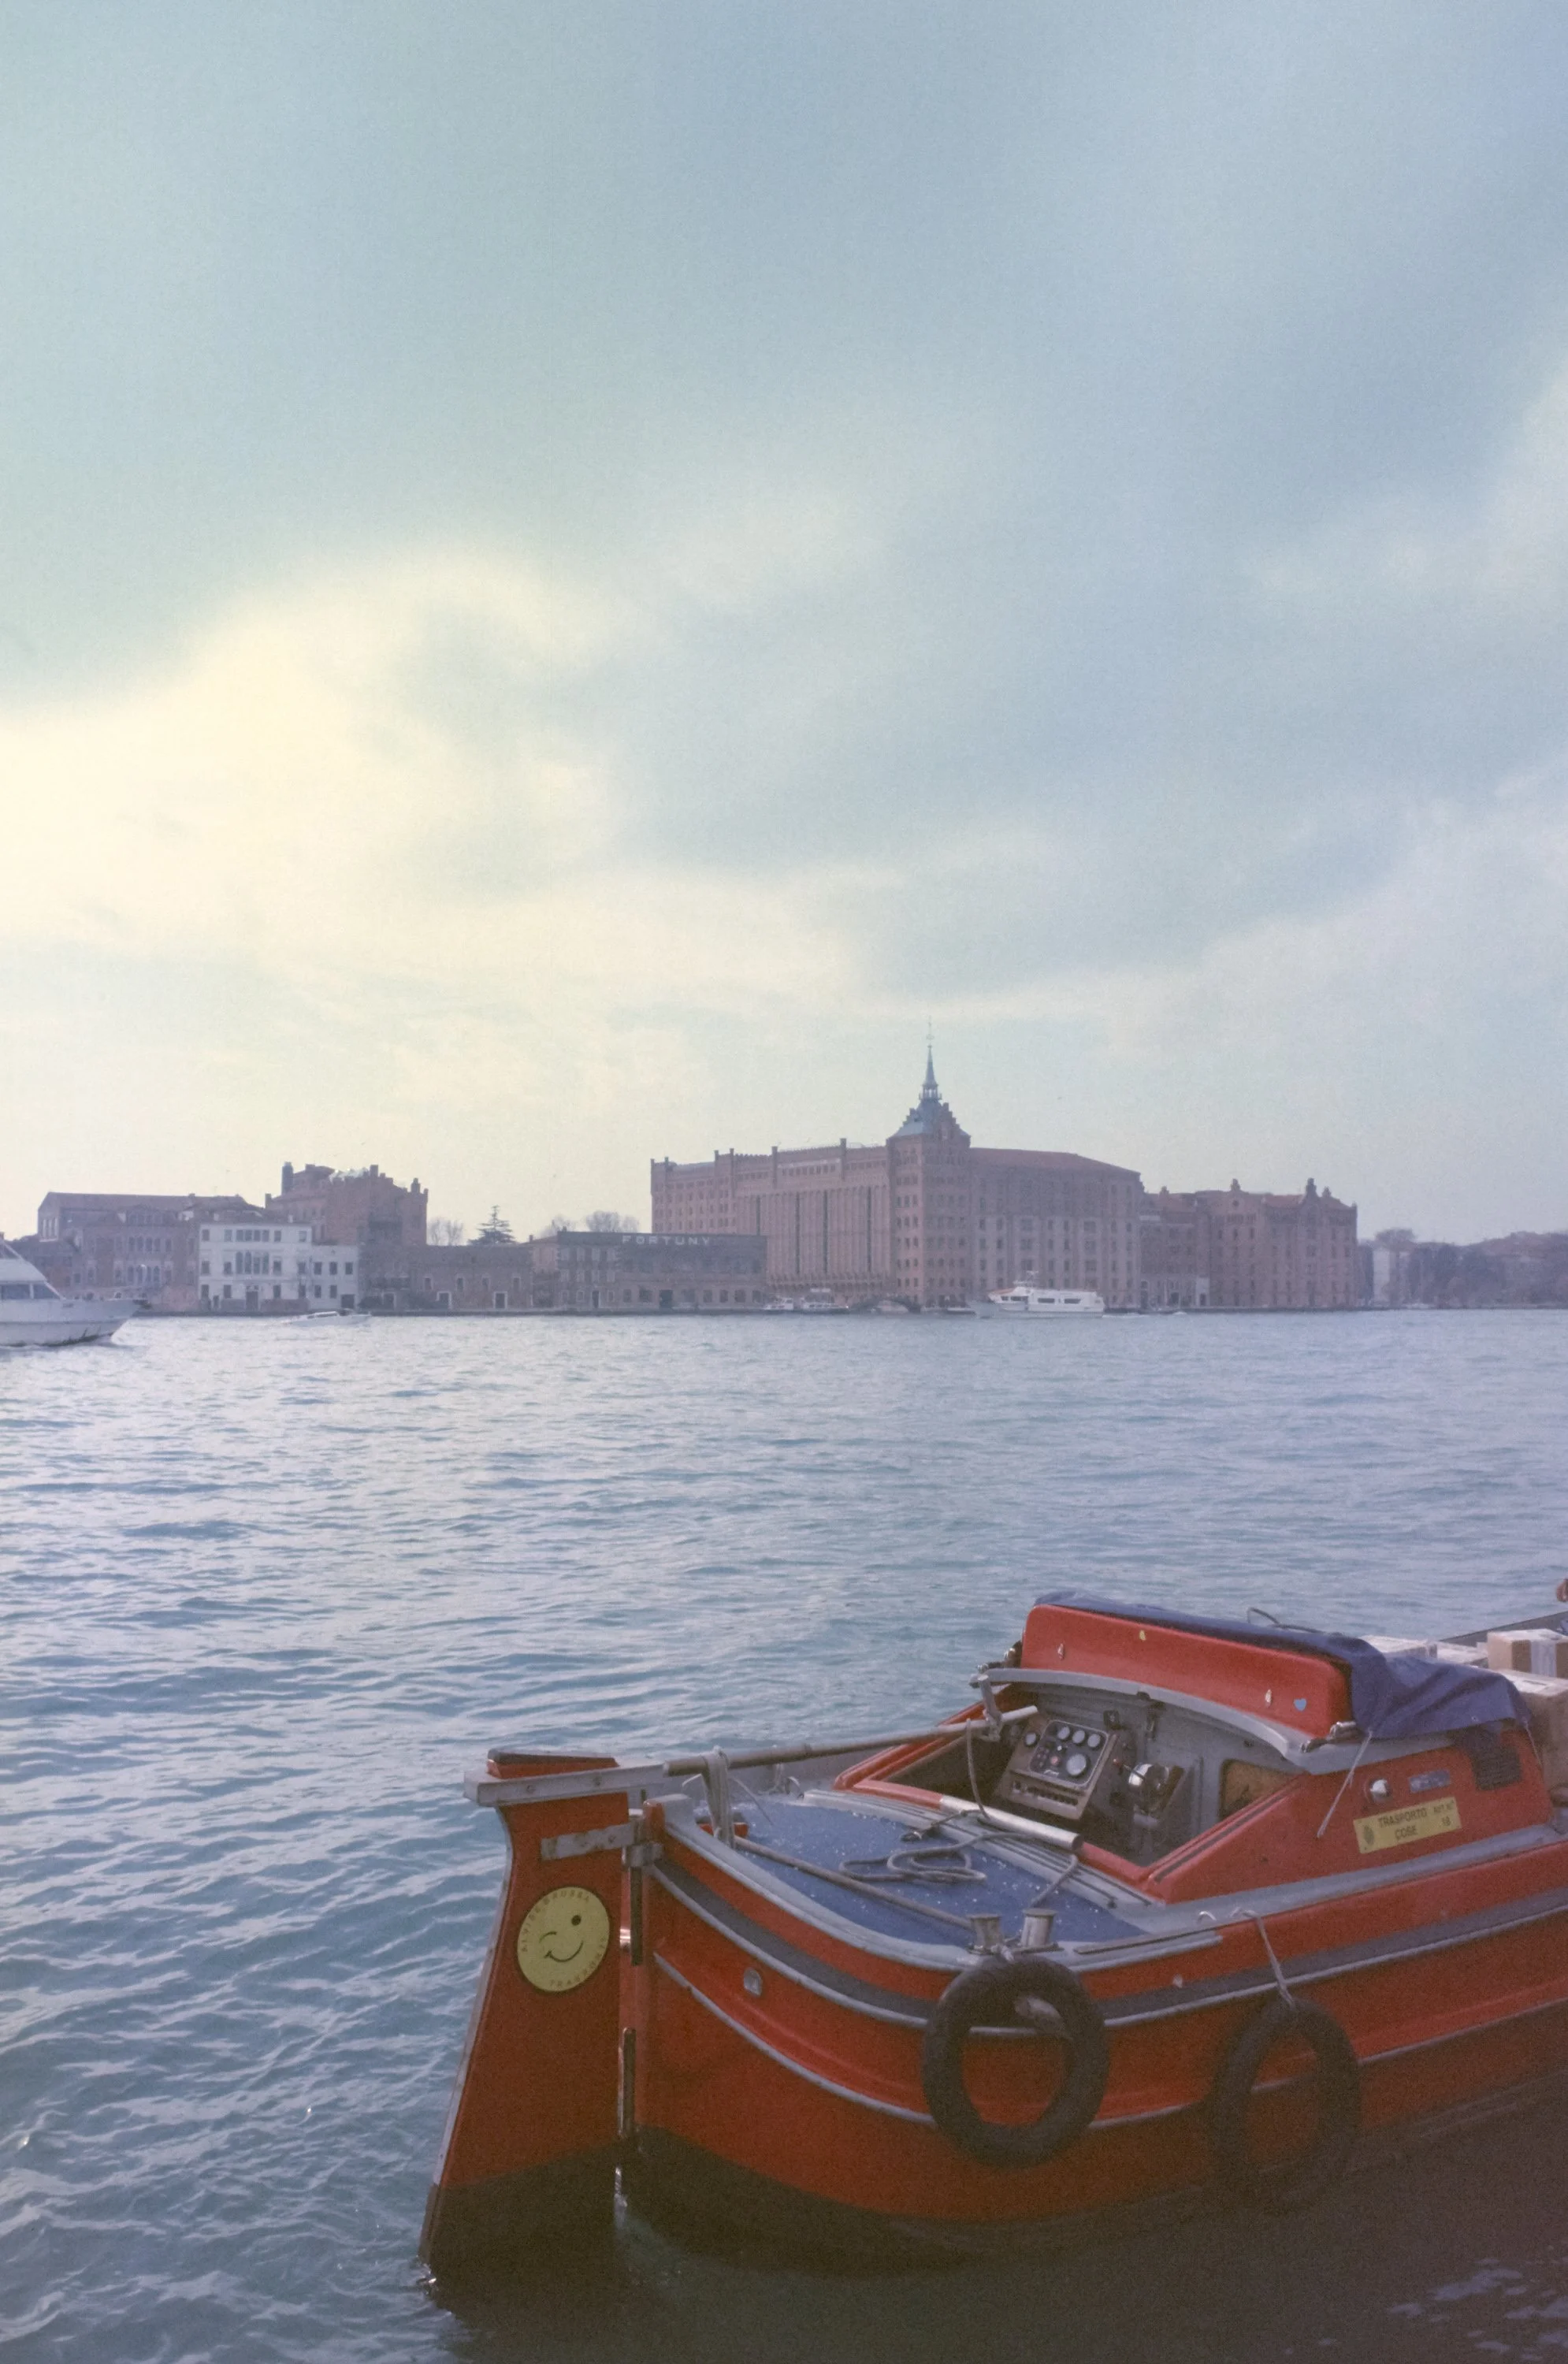
Let’s be real: shooting expired Kodak Ektachrome 64T is a gamble. It’s a tungsten-balanced film, meaning it’s designed for the warmth of studio lights. I was lucky to spent the a couple of days around new year 2026 in Venice and shot it under the misty, winter light. It delivers a heavy blue cast that, combined with 20 years of expiration and not ideal storage, can make your scans look like a cold, cinematic dream or a complete purple blueish disaster.
But don't throw those rolls away. Saving expired slide film is all about understanding how to manipulate the color shifts in post-production. (And a bit of courage and luck) Here is my workflow for turning crazy shifted slides into something more “normal”.
Venice meets Tungsten: Blue on Blue
Venice’s haze and the reflection of the water already create a cool color tone. Using a tungsten film like 64T without an 85B filter meant I was expecting very blue results. As the film ages, the yellow layer weakens, leading to a massive shift toward magenta in the shadows. Maybe the filter might have helped, maybe not. We will never know. Its hard to predict things when you’re shooting expired slide film. Which is also the reason why it’s so exciting.
Metering
These were my first rolls of this batch, so i used my trusty Sekonic L-308X in incident mode, metering the film at box speed ISO64.
The Strategy: Stretching the Histogram
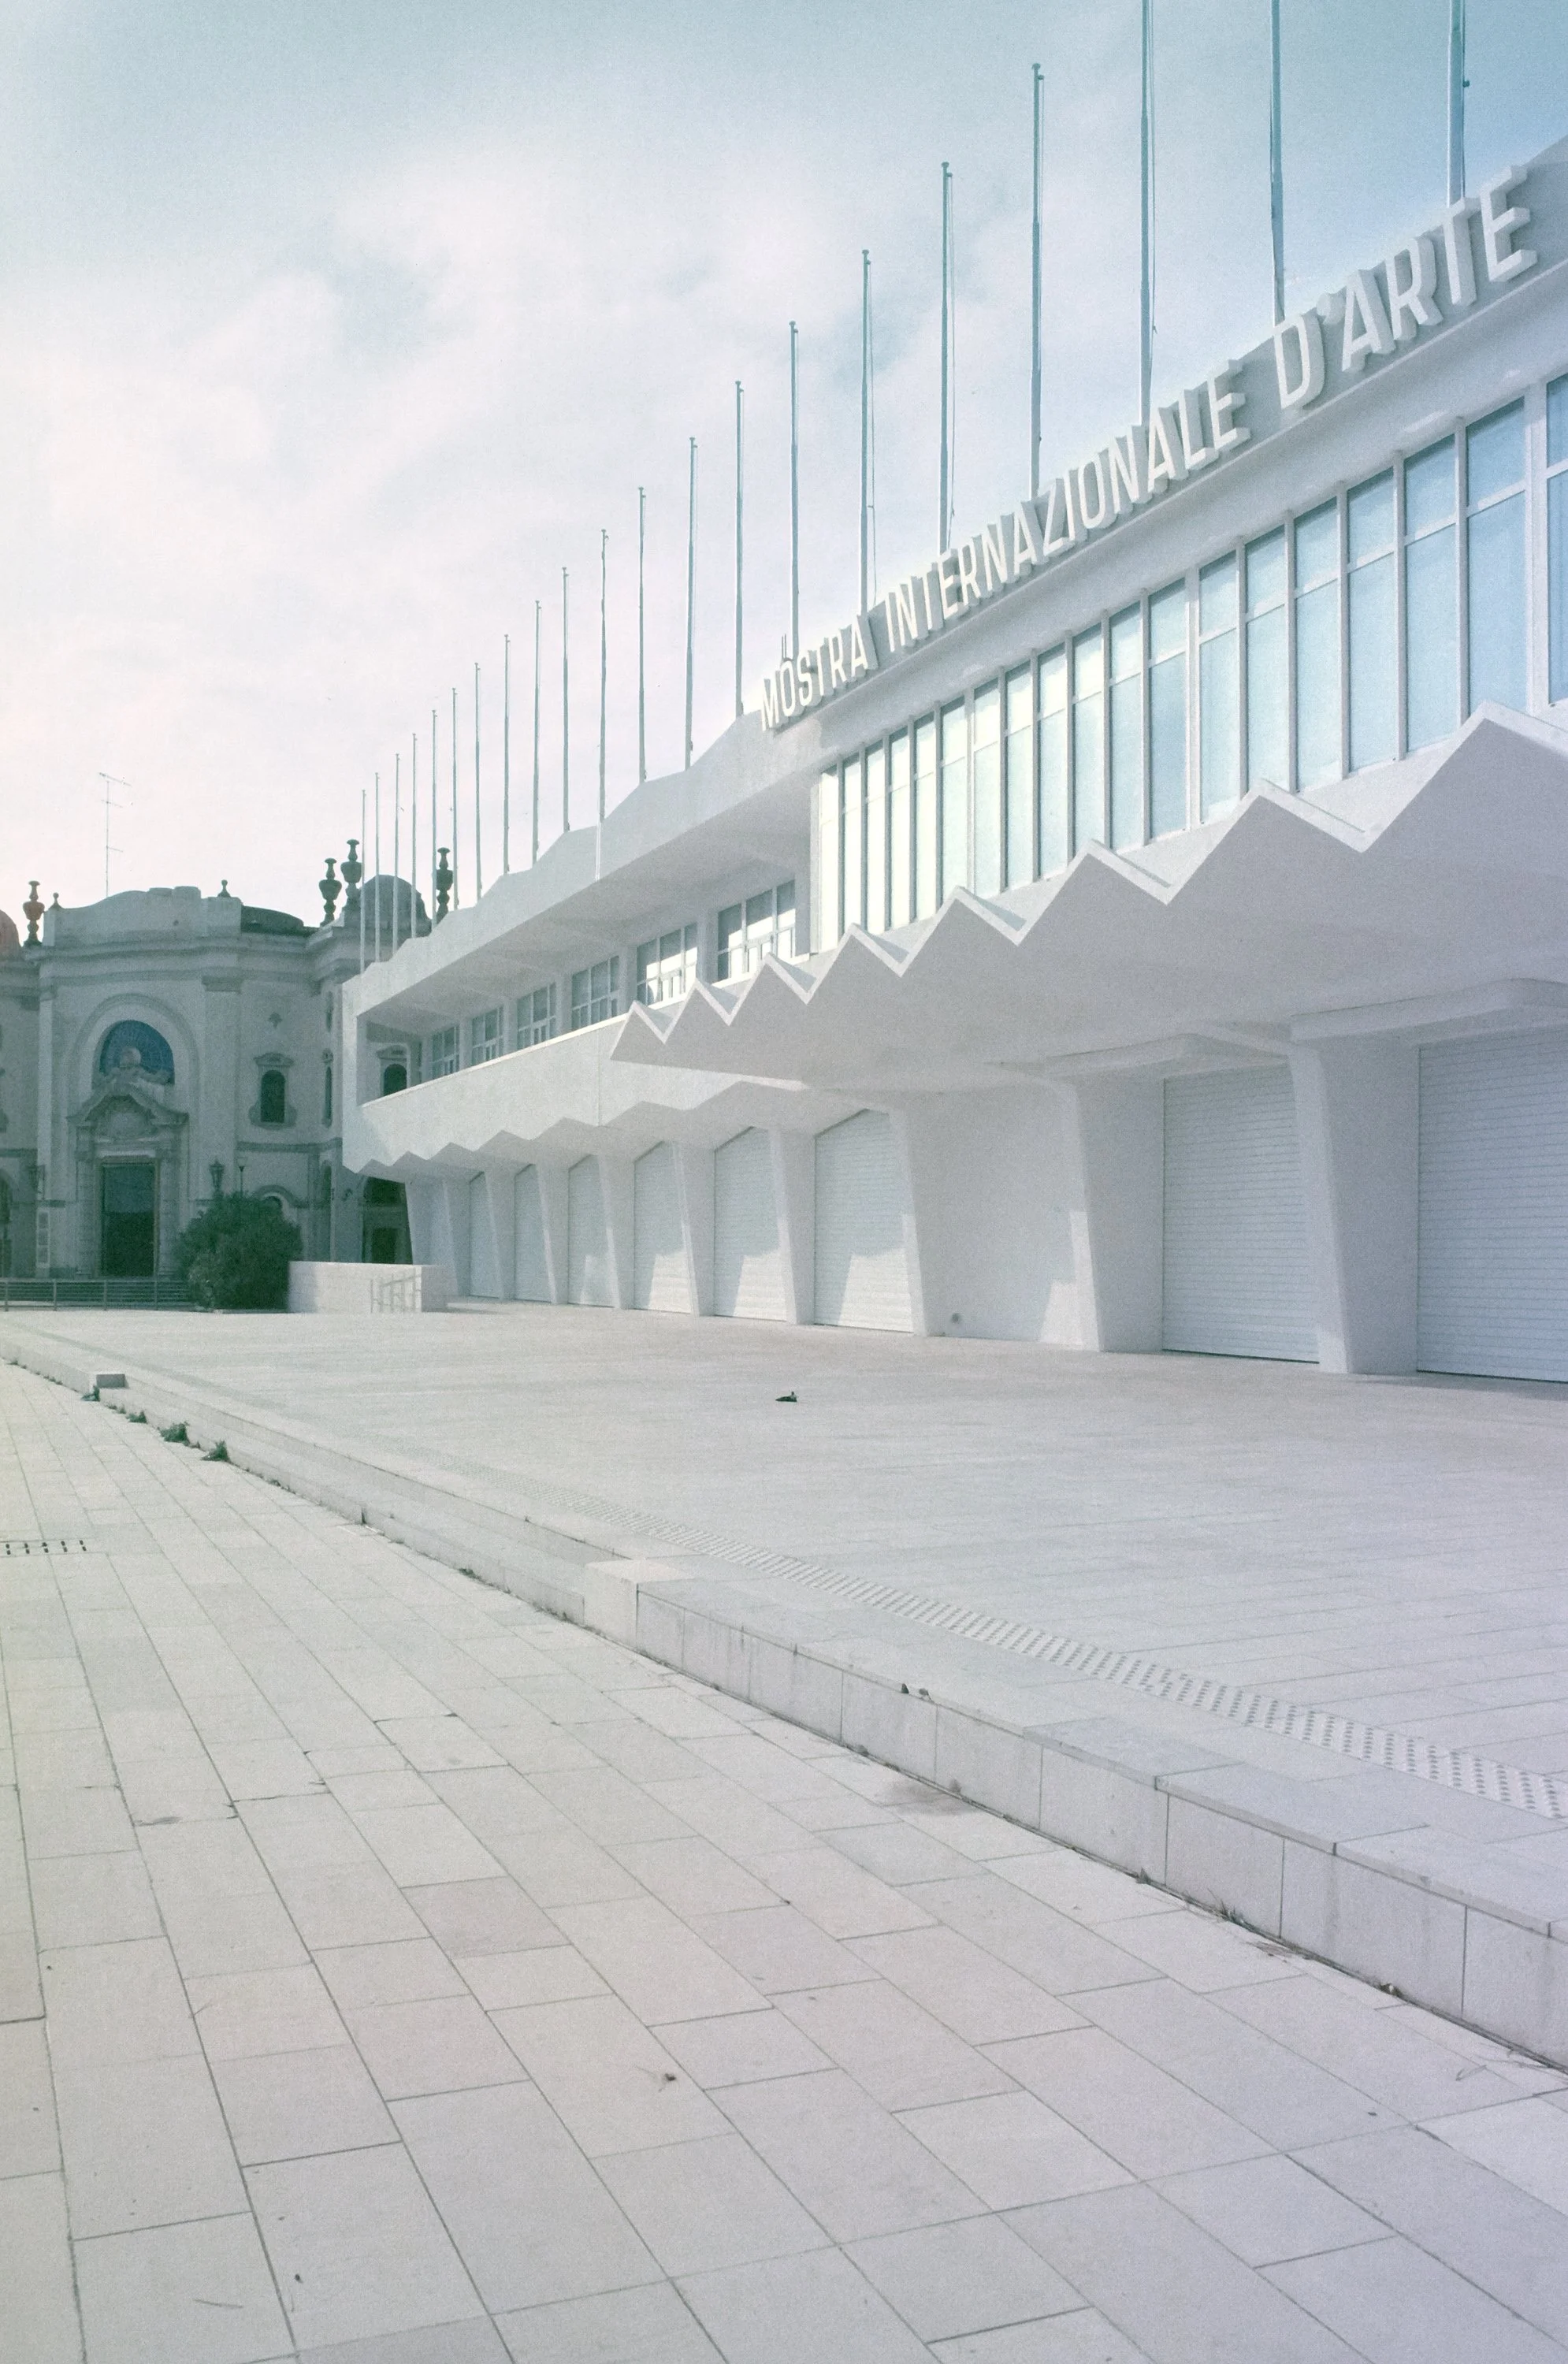
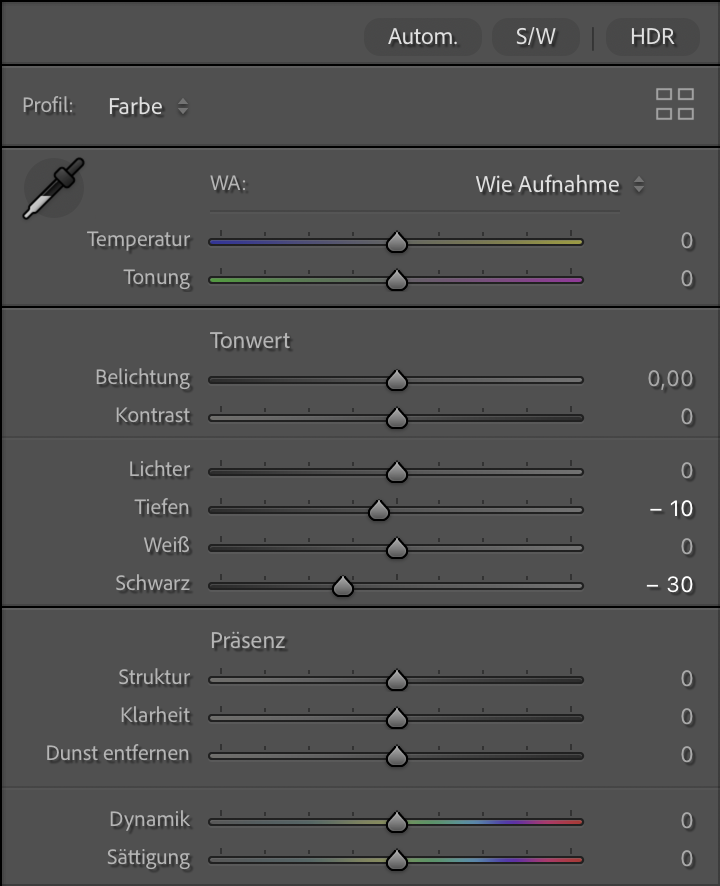
Forgett "Auto" the auto correct button as well as the regular white balance dials. A global white balance fix would have just shifted the problem. We’re dealing with something more severe here. To save this shot of a Venetian facade, I had to treat each color channel like a separate patient, performing a manual black-and-white point adjustment for each individual channel, essentially stretching the histrogram using the RGB Curves.
By "stretching" the histogram of each color, I forced the film to reclaim its dynamic range.
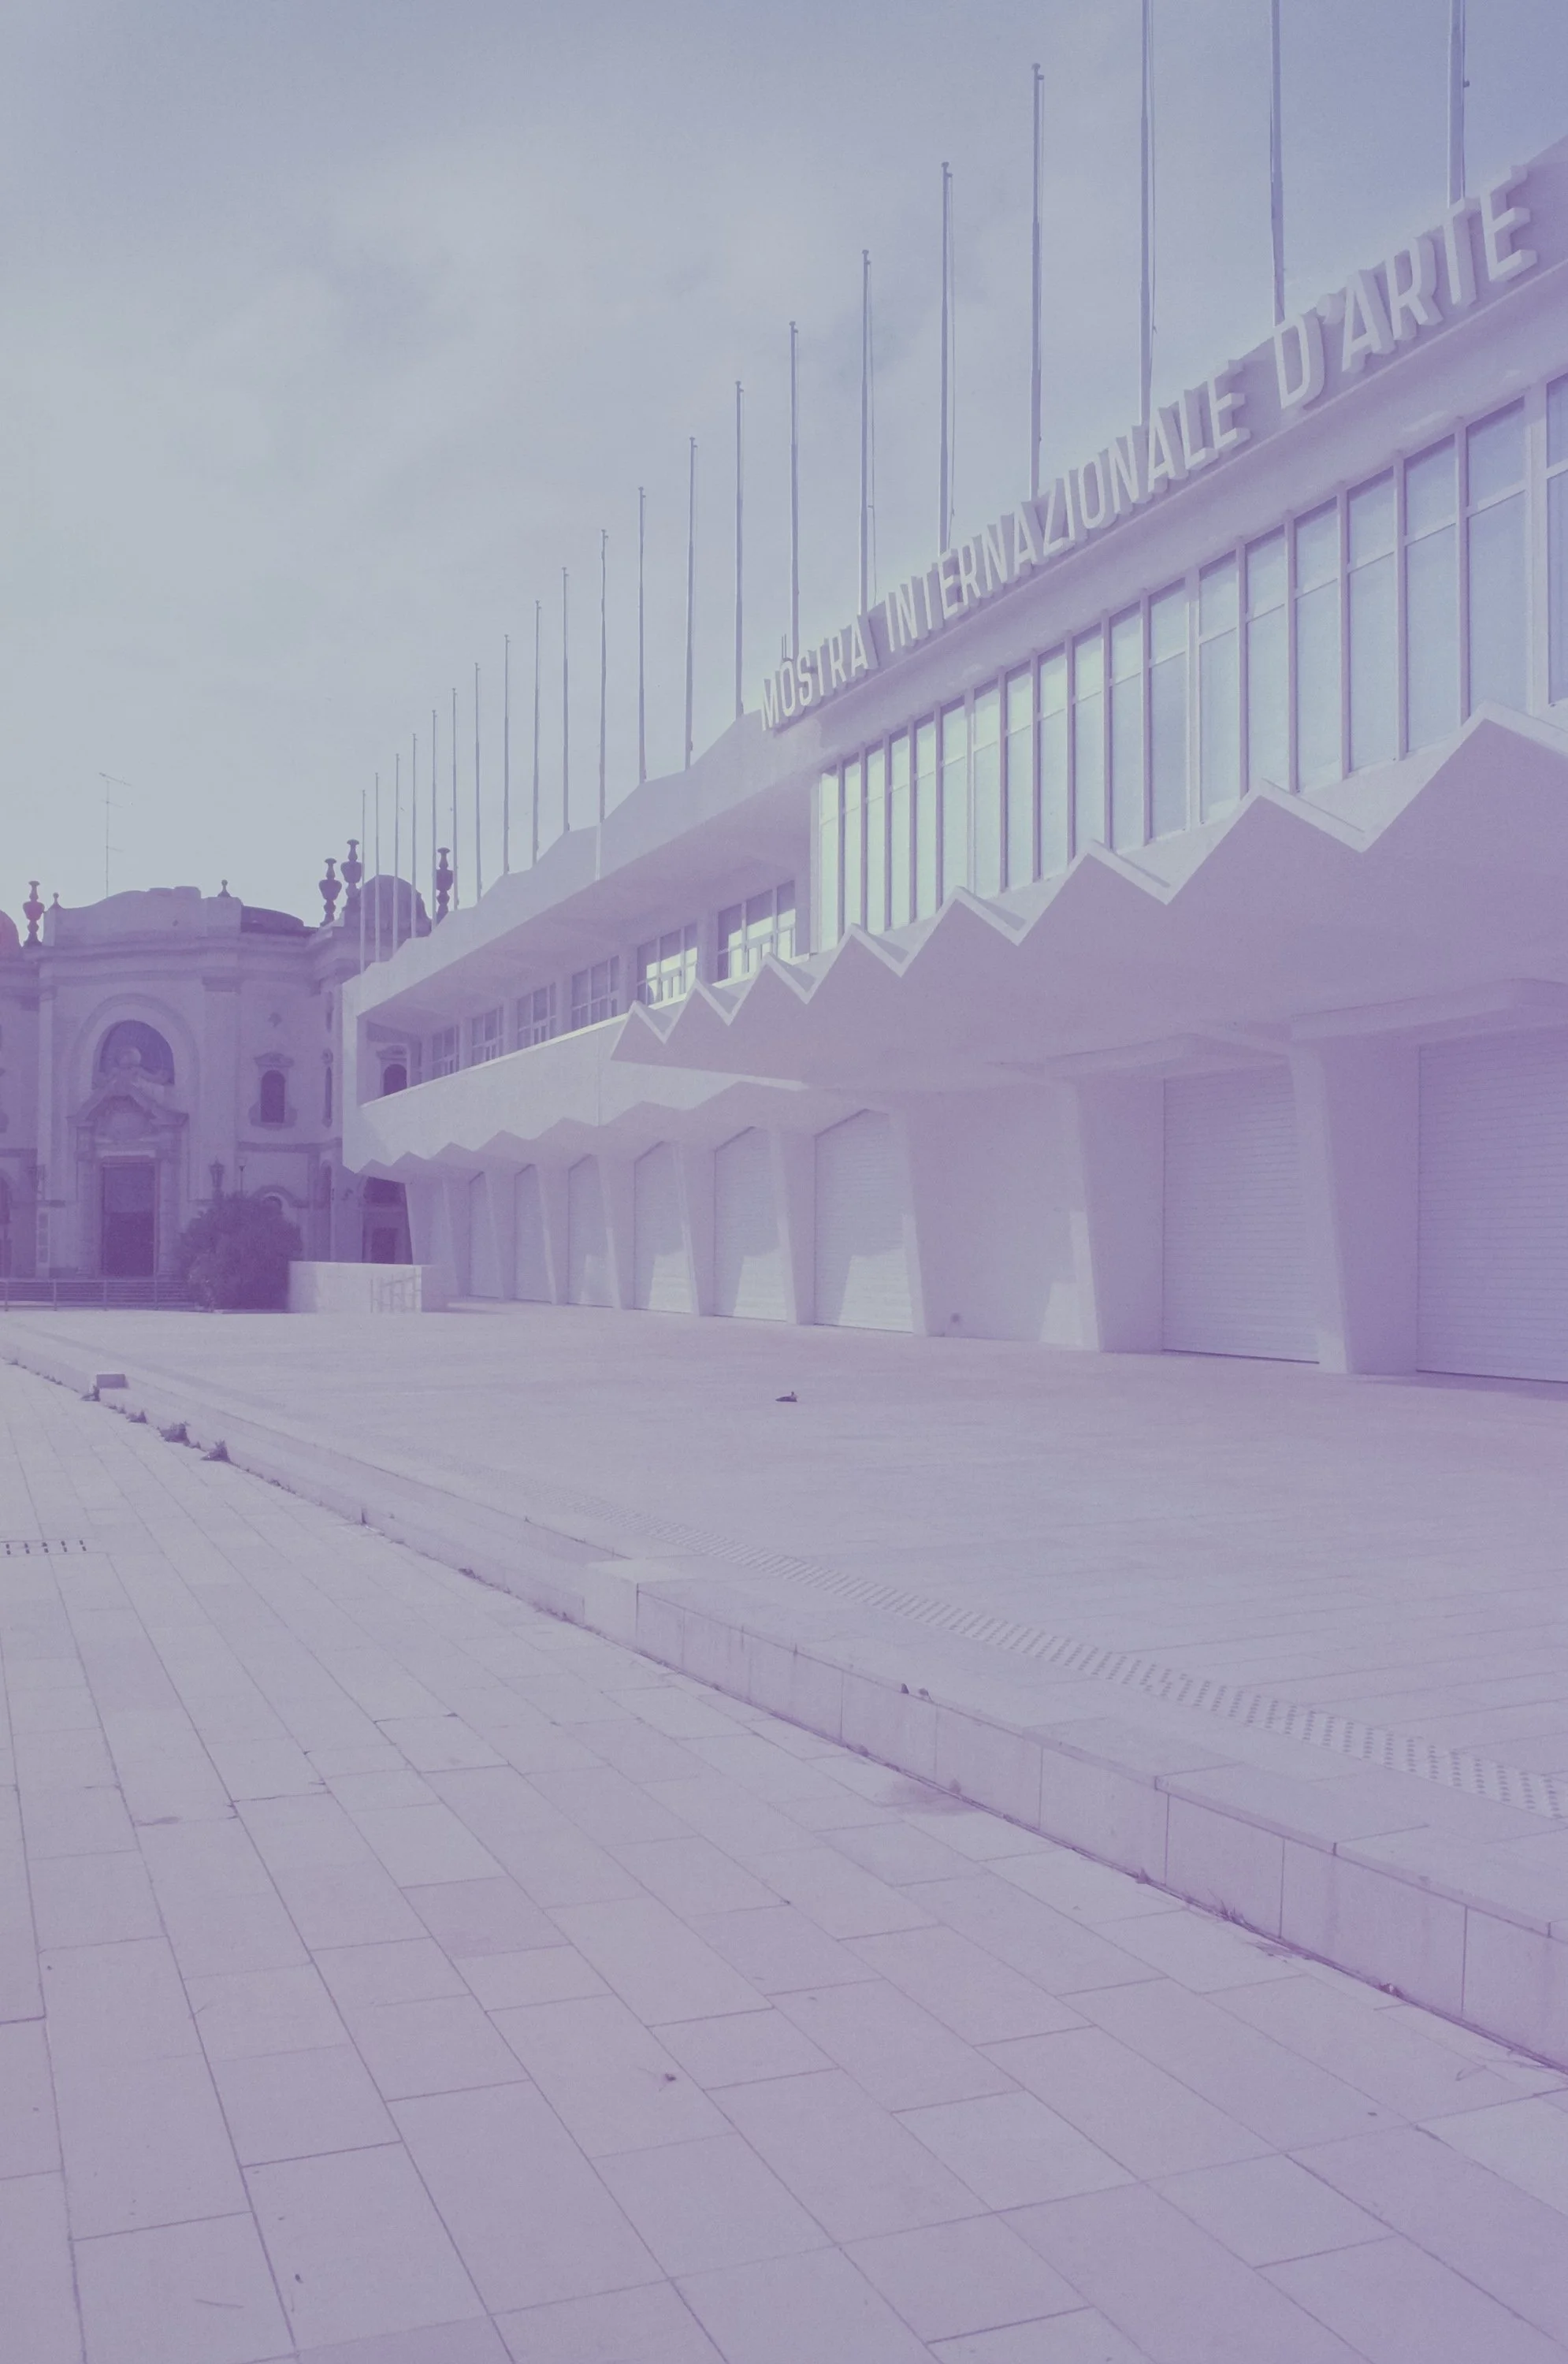
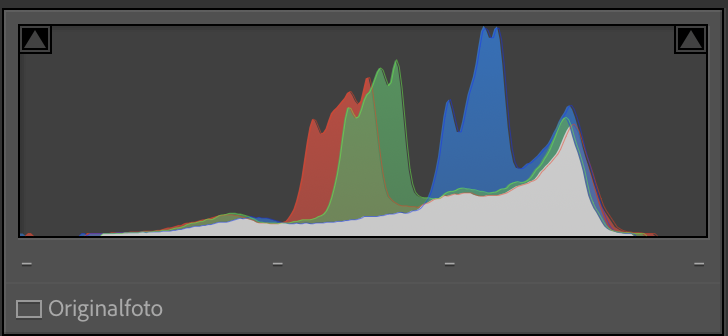
The Raw Scan
The original scan is overwhelmed by a heavy violet/blue cast. Because Ektachrome 64T is tungsten-balanced and shot here in January daylight, the blue channel is "overflowing," while the expired chemistry has pushed the shadows deep into the magenta territory.


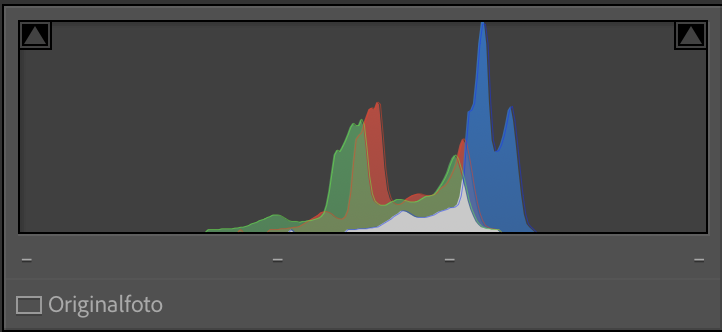
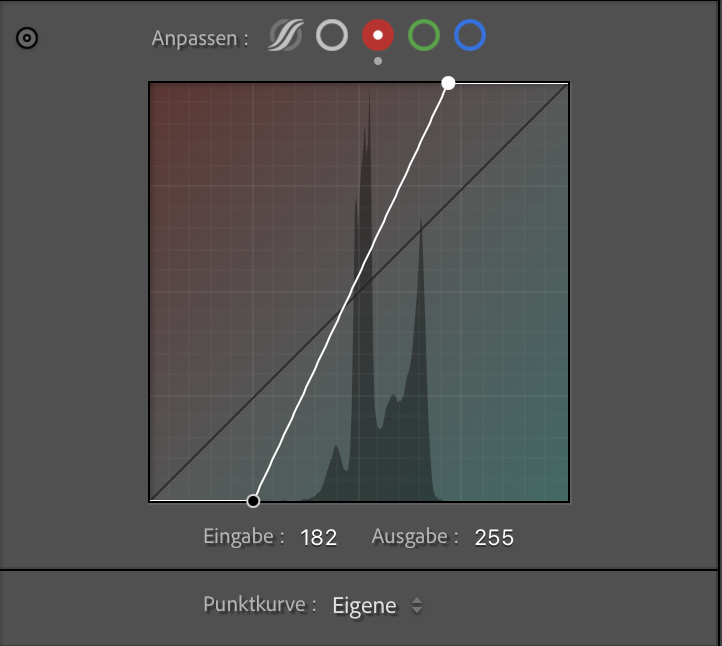
Red Channel:
My red data started very late in the shadows. By dragging the Black Point almost to the actual beginning of the curve data, I forced the deepest red values to become a deep black (removing the milky purple fog). I then did the same for the White Point, pulling it in from 255 to 182, ensuring that the warmest tones in the Istrian stone were properly represented as highlights.

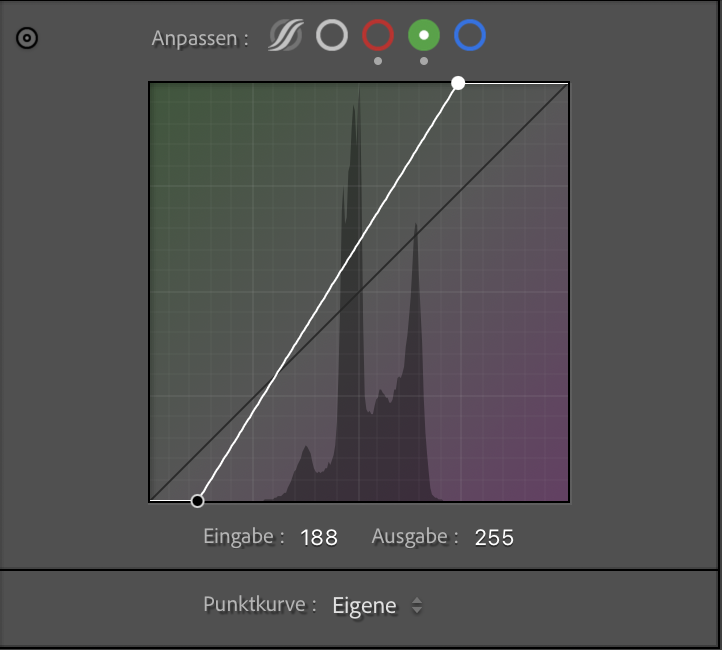
Green Channel:
I repeated the process. Again, setting the Black Point is essential, (checking your histogram to match each channel is a great help here) but it was the White Point adjustment (Input: ~188) that allowed me to pull the green values into the highlights. This neutralizes the magenta cast that can "stain" the pale buildings, making them look white instead of pink.

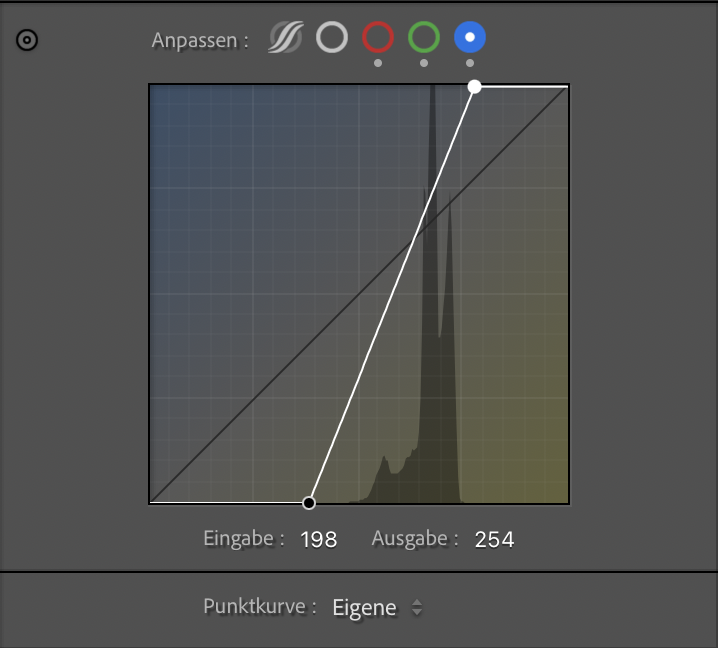
Blue Channel:
This is the tungsten-correcting step. The blue histogram had empty space at both ends. I set the Black Point (Input: ~198) and, most importantly, pulled in the White Point to make the winter sky over Venice crisp blue like i remembered it.
Final Polish: Contrast & Sharpness
Once the color channels were re-aligned, the image was technically "correct," but it still had a bit of that expired-film haziness. I applied three final steps:
Global Black Point & Contrast: I dropped the global Blacks and slightly adjusted the Shadows. This anchors the image a bit more.
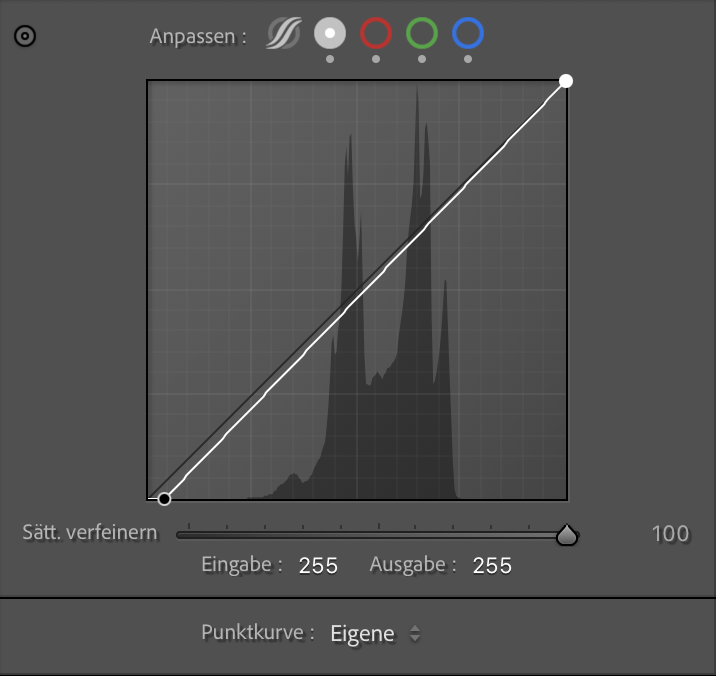
The Tone Curve: A subtle blackpoint touch on the RGB master channel adds that characteristic slide film punch. It increases the perceived dynamic range by making the shadows "deeper."
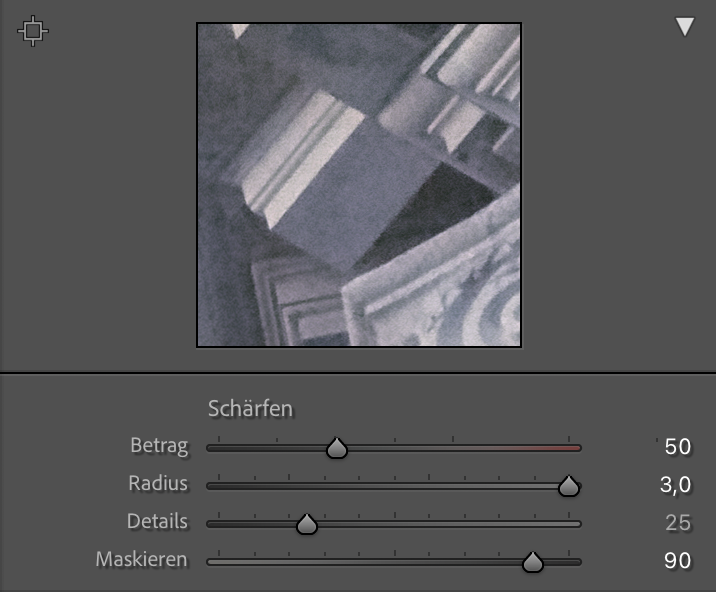
Controlled Sharpening: Expired film grain can be erratic. To enhance the architectural details without making the grain look digital and "crunchy," I used High Masking (90).
The Goal: Sharpen only the hard edges of the sculptures and columns while leaving the smooth sky and the organic film grain untouched.
Shorcut tip: Hold the option key (Mac) while draggin the masking slider to see where the sharpening is actually applied.


Final Thoughts
At the end of the day, even with all the histogram surgery and digital recovery, the question remains: Is it worth the effort? In my opinion, absolutely. While the "expired look" can be extreme, it has a creative justification that fresh film simply cannot replicate. Kodak Ektachrome 64T, even 20 years past its prime, remains a beautiful emulsion. It possesses a unique duality, simultaneously sharp in its detail and soft in its transitions. Whether you choose to leave the heavy color shifts for a surreal atmosphere or apply this RGB-mapping method for a more natural look, the result is always "old school" in the best way possible.
The real magic of shooting expired slide film, however, is the lack of total control. You never truly know what you’ll get. This workflow gives you the power to rescue your vision, but it leaves enough room for the film to tell its own story. It’s a collaboration between you, an emulsion of the past, and the light of the present.


Enjoyed this? You might also like:
If you found this article helpful, check out my other deep dives into the world of expired emulsions and color recovery:
Mamiya M645 Review (2026): The Best Entry into Medium Format?
Nikon F Review (2026): Shooting the Indestructible 35mm Legend
FPP Retrochrome 400 Review: Shooting High-Speed Surplus Slide Film
422 Meters of Frozen Gold: The Expired Ektachrome Heist Part I
422 Meters of Frozen Gold: The Expired Ektachrome Heist Part II
Embrace the Blues: Why Ektachrome shifts cooler and how to handle it
Minolta SR-101 (SRT 101) Review: The Ultimate Mechanical SLR in 2026?